

An Elegant Summer Dish that is also Family-Friendly
I have long loved this simple Cherry Tomato Tart recipe that manages to capture the beauty of summer in an elegant yet child-pleasing dish. I was initially inspired by David Lebovitz’s wonderful recipe from his blog, which is filled with delicious French recipes and captivating tales. I forgo using his big slices of tomato as I find they can be a bit wet, and my children prefer cherry tomatoes to slices of larger tomatoes anyhow! Sometimes when the summer squash are prolific, I might slip a few rounds in underneath the cherry tomatoes, but I generally keep it simple. In place of goat cheese, mascarpone can be dolloped on top when the tart comes out of the oven, and you couldn’t go wrong with a good ricotta. But something about the goat cheese just makes this tart sing. If you like, you can drizzle the whole thing with honey as David does, but I find that if I am using ripe cherry tomatoes from the garden, they really don’t want or need the additional sweetness.
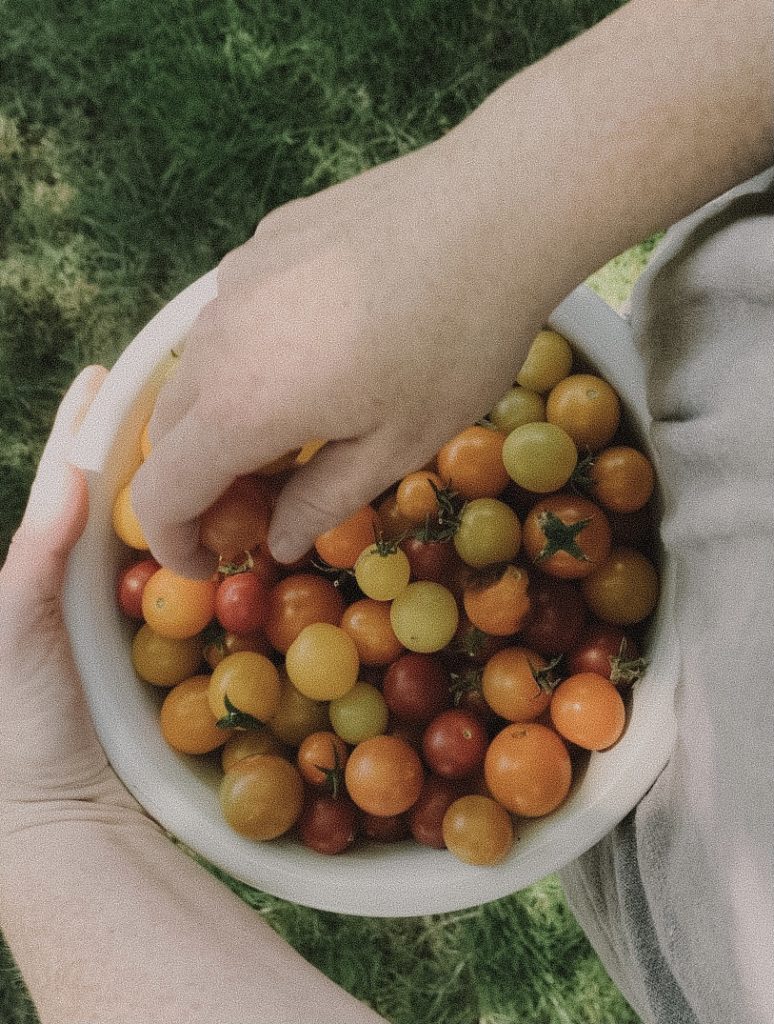
At its core, this is a simple dish that combines dough with tomatoes and cheese, which is essentially the definition of pizza. So when I encounter hesitant children, I find that calling it “French Pizza” leads to a bit more open-mindedness! Involve them in picking out the cherry tomatoes, the baking process, and choosing the rest of menu. They love to feel a part of the process.
*a note about Growing Homes recipes *
My recipes are written a bit differently than the standard recipe format. I believe that the way traditional recipes are laid out aren’t always the easiest to follow, especially if you are trying to cook in a kitchen with lots of distractions and little helpers. So while my recipes may look longer than most, I believe they are easier to understand and experiment with. They are broken down into helpful steps, instead of just a paragraph of directions. For each step, I’ve listed the tasks that your young child might be interested in helping with, and good places where you can walk away for a moment if you need to tend to a crying baby.
Cherry Tomato Tart
Tools
Rolling pin
Big bowl
Small cup or bowl
Tart tin with removable bottom
Ingredients
1.5 cups of flour (or 210 grams) AP Flour, plus more for dusting (You could experiment with whole grain or gluten-free flours, but I’ve only made this particular tart with a high-quality all-purpose. If you use some portion of whole wheat, you might need an extra tablespoon of ice water to fully hydrate the flour.)
1/2 Teaspoon Kosher Sea Salt
1 stick plus 1 tablespoon (or 4.5 ounces or 125 grams) of Cold Butter, cut into cubes. I like to cube the butter than place it back in the fridge on a plate until the very last minute so it stays cold.
1 Tablespoon Ice Water, maybe a tablespoon more if needed
1 Large Egg
A good sharp Dijon Mustard (even if your kids don’t like mustard!)
Enough Cherry Tomatoes to fill the bottom of the tin
A couple ounces of fresh soft Goat Cheese
Fresh Basil leaves
Step One— Mix the Tart Dough!
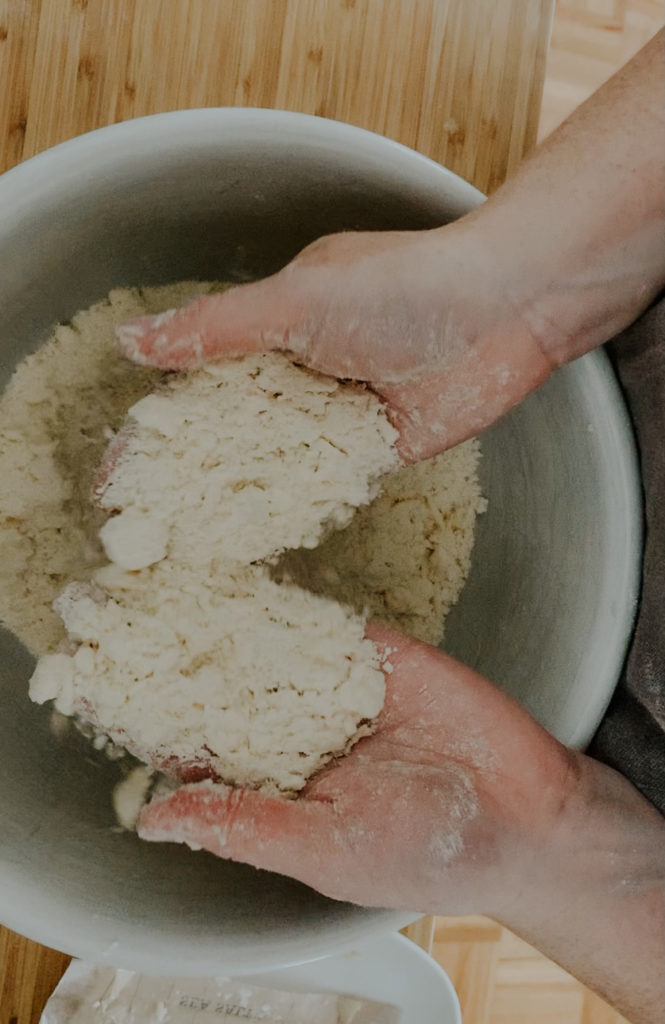
Lightly dust the surface of your work area with flour. Preheat the oven to 375. Whisk the 1.5 cups of Flour and 1/2 Teaspoon of Salt together in a big bowl, then drop in the butter cubes. Rub the Butter into the Flour until the pieces are flattened and the whole thing feels like pebbly sand. Beat the Egg in a small cup with 1 Tablespoon of Cold Water, then mix that into the flour. Work quickly so that you don’t melt the butter too much, and stop as soon as the dough comes together— be careful not to overmix or the tart will be tough and a bit less delicious!
*At this point you can step away if you need to, just slide your dough into the fridge to prevent the butter from melting. When you are ready to continue, take the dough out of the refrigerator to warm up slightly before you attempt to roll it out. *
Kid Tasks:
Small children can help with most any of these tasks, from dusting the work surface to rubbing in the butter. Mine usually love squishing the butter around, though make sure to have a damp towel handy to wipe their small hands, for when they inevitably start to get carried away.
Step Two — Roll out the Dough!
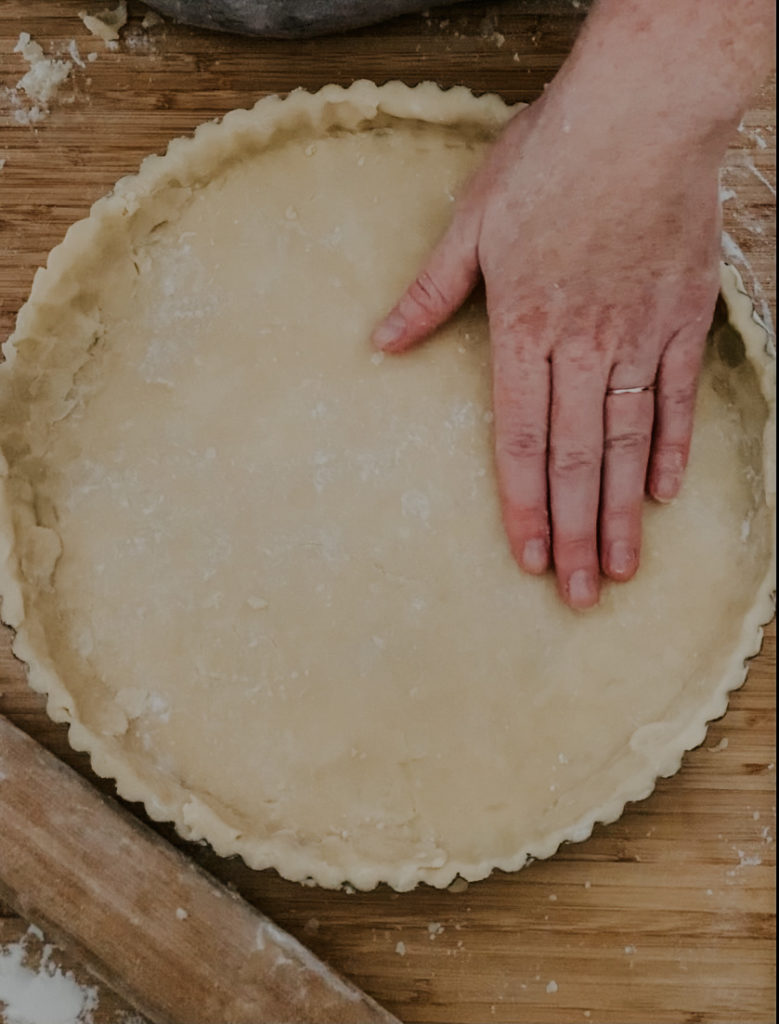
Place the dough on the lightly floured counter. Rub some flour over the rolling pin and gently roll the dough out in a rough circle. You’ll want it to be about an inch to a half-inch larger than your tart tin, so that it can come up the sides. Once you’ve got about the right shape, roll the dough onto the rolling pin and scoot it over onto the tart tin. Press the dough down onto the tin with your finger, gently smooshing it into the sides so that it comes up all the way to the top. If you need to rip a few pieces to patch some bare spots, feel free! Once the dough fully covers the bottom and sides of the tin, run the rolling pin across the top to shear off the excess. If you have a particularly small tart tin, you might have some extra dough. You can make an extra free-form tomato tart with this dough, or even use it for a small peach/berry/plum/fig tart for dessert!
*If you need to, put this whole tart into the fridge until you are ready to continue. Keep it chilled until ready to fill and bake so the butter stays cold! No need to let it come up to room temperature before filling and baking.
Kid Tasks:
Children of all ages seem to adore the rolling pin! They can help roll, smoosh, and shear. Remember that this tart is fairly forgiving, so if they begin to manhandle it, do not panic! If it gets to squishy and warm, just pop it in the fridge to cool down again. Deep breathing is key for you here.
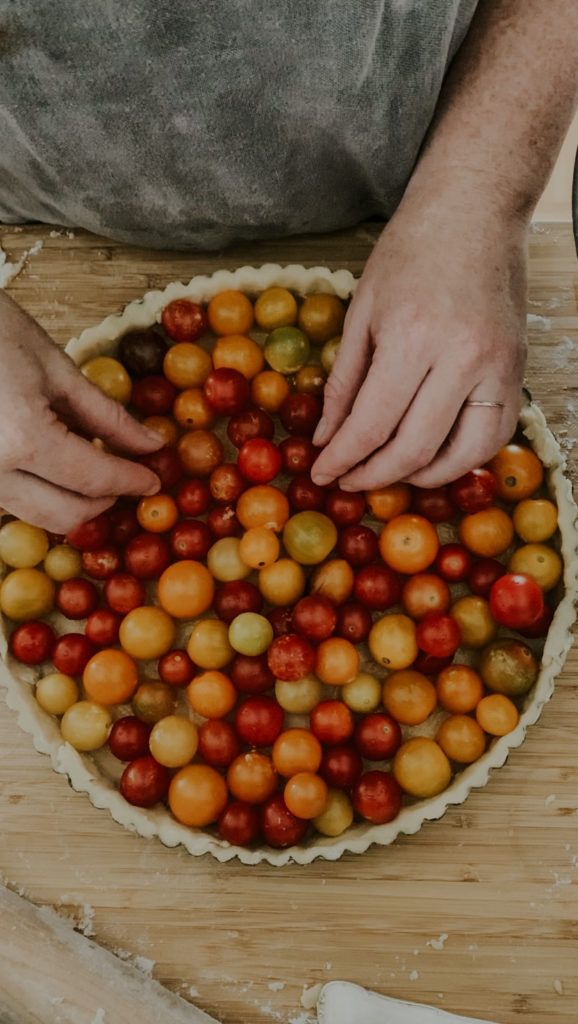
Step Three — Fill the Dough!
Now that you’ve got a nicely formed dough, you can add the tomatoes. Start by smearing a generous layer of Dijon Mustard all over the bottom of the tart, using either the back of a spoon or an offset spatula. Even if you or your children don’t love mustard, I find this to be a crucial part of the tart. The mustard adds a bit of sharpness and acid, and the whole thing feels flabby without it. Once it is baked, you can hardly see of taste the mustard, but if you are still feeling tentative, you can do a very thin layer or leave it out altogether. But fair warning— because there are so few ingredients to this tart, all of the ingredients really do play integral roles!
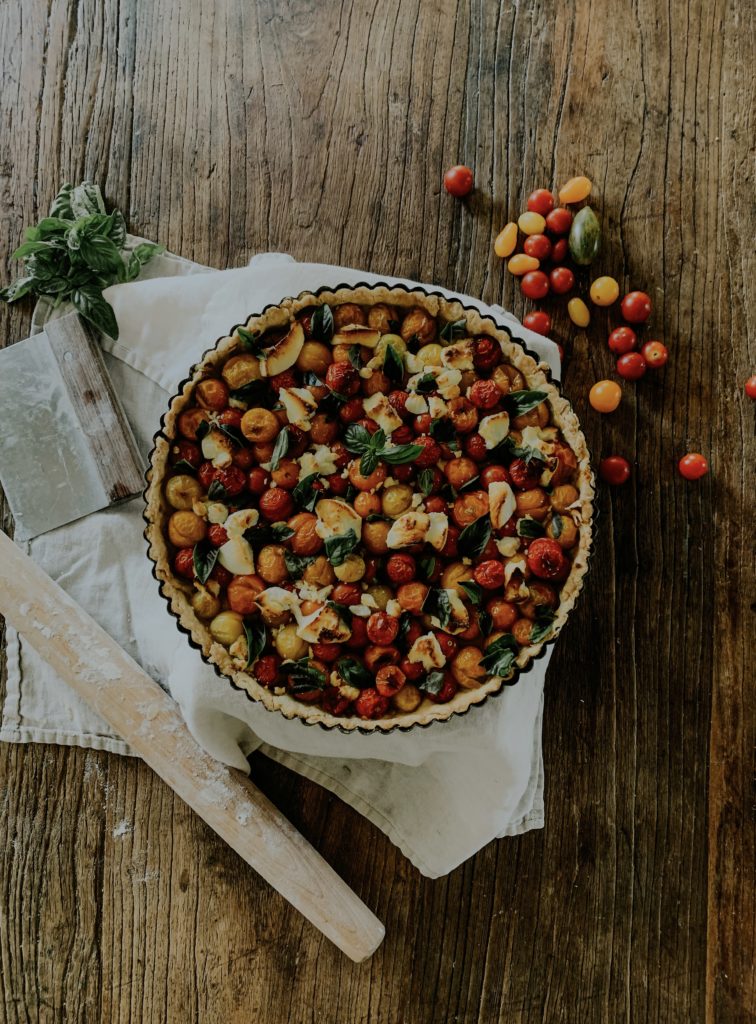
Once the mustard layer is down, you get to tip all the cherry tomatoes in! You’ll want to wiggle in as many tomatoes as will fit in a single later, as they will shrink slightly. If some of them pop up a bit higher than the rest, that is just fine. Once your tomatoes are all nestled in snugly, you can arrange dollops of the goat cheese on top. I find that goat cheese crumbles can be a bit rubbery, so fresh cherve is the best to use. You can vary the sizes of the dollops, going anywhere from a few tablespoons down to a single teaspoon. Just make sure that it’s evenly distributed so that each slice will end up with some cheese.
*This is a great time to rest the tart in the fridge if you aren’t ready to bake! I will frequently prepare this tart in the morning with my children, when they are at their most attentive and rested, and then let it hang out in the fridge until the late afternoon/early evening when I will bake it up for dinner. If you want, you can even leave it overnight in the refrigerator (though I would recommend covering it with a large beeswax or plastic wrap if you do that, so that it doesn’t dry out too much)!
Kid Tasks:
Children can do most of these tasks, though take care to supervise closely for the mustard spreading, making sure not to pierce the bottom or the tart. Arranging the tomatoes is always a hit, as is dolloping the cheese! Some kids will find the cheese part too sticky and messy, others with have too much fun with it. As always, keep a damp towel (or towels!) handy to take off the pressure.
Step Four — Bake the Tart!
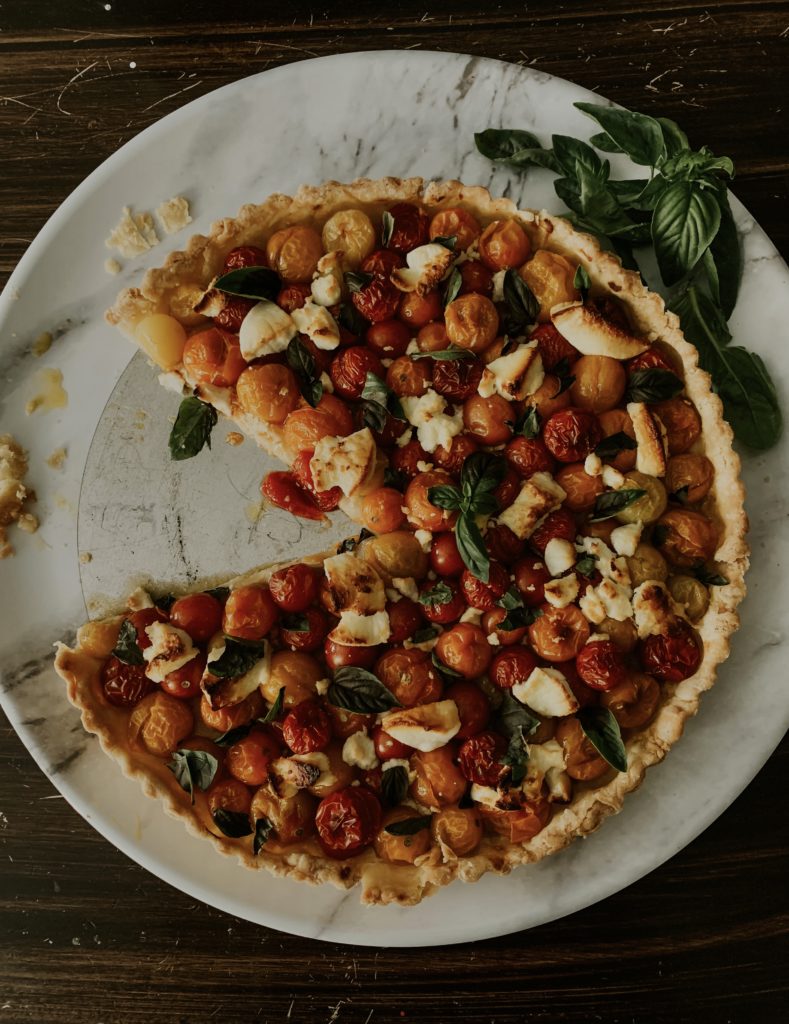
After your oven has reached 375 degrees, pop the tart into the middle rack for about 30 minutes. If your oven heats unevenly, rotate the tart around about halfway through. The tart may need more or less time, depending on your oven or the size of your tart pan. You just need to keep an eye on it. The tart is finished when the dough is golden brown and the tomatoes are hot and blistery, but haven’t collapsed entirely.
Kid Tasks:
Whenever we are dealing with high temperatures, it’s best for young children to observe until they are old enough to take safety very seriously. You can have them help you set the temperature on the oven, and set a timer for checking the tart. But it’s wise to leave the manuvering in and out of the oven to more capable adult hands.
Step Five — Serve & Eat!
After the tart has cooled a bit on the counter, you can pop off the removable tart ring and slide the tart to a serving platter or large plate. An easy way to do this is to put the tart pan on top of a can or heat-proof coffee mug, letting the tart ring slide down to the counter. Take care to protect your arms when moving the hot tart pan around— I have gotten a few painful burns from my tart pan rings when rushing! Tear up the large basil leaves, leave small ones whole, and shower them all over the top of the hot tart. (Kids love this task!)
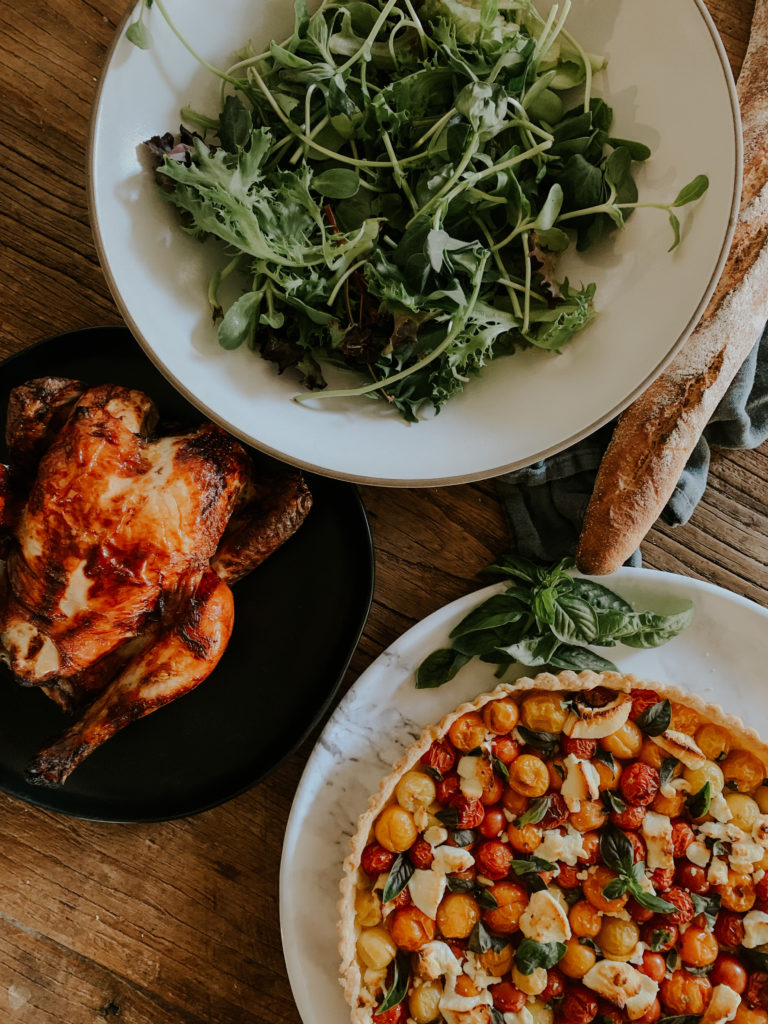
I like to serve this cherry tomato tart with a crisp green salad, or a selection of crunchy vegetables from the garden with a yogurt dip, or even grilled green beans. A cheese plate with a few nuts and some salami never hurt either. It shines beautifully alongside a roast chicken or a filet of wild-caught salmon. You can use the tart for a grown up appetizer at a dinner party, a light lunch, or a centerpiece for a garden dinner. If you involve your children in the tomato picking (or buying them at the market) and baking process, they are much more likely to give it a try. It might even become a family favorite!
Please let me know if you enjoyed this style of recipe, or if you make the tart. I love hearing your thoughts!
Happy baking!
Tags:
")
Thanks for your blog, nice to read. Do not stop.
This looks very good. I am planting black cherry tomatoes this year, I hope I get a bumper crop and I will make this. It is easy on the eye too.